Slax for the uninitiated

After an initial rendezvous with Slax and successfully using it while booted from a usb drive, I decided to put together a quick step guide to help readers setup something similar on their machines should they choose to use Slax.

The key to using this live distro is to be able to save the changes and user data, so that the next time you boot into Slax, you could start off from where you left. Persisting data is a default option in Slax, so its already taken care of. To make most of the usb drive format it with ext4 file system. Use Gparted to format the drive to ext4 (may require root access on host pc). This native file format will allow to save changes upto the physical capacity of the drive. Thus using a higher capacity drive (say upto 64GB) will go a long way in case you want to carry your entire work with you.

Slax is a simple zip/iso download and the first thing you should do is extract the contents to a local folder and have a look at the contents. Iso and zip files are available for 32 bit and 64 bit architectures so get versions compatible with your laptop. Likewise all dependencies will have to be compatible. Slax download just has a /slax folder at top level. Under /slax you will be able to see stuff like boot, modules and few default sb files.

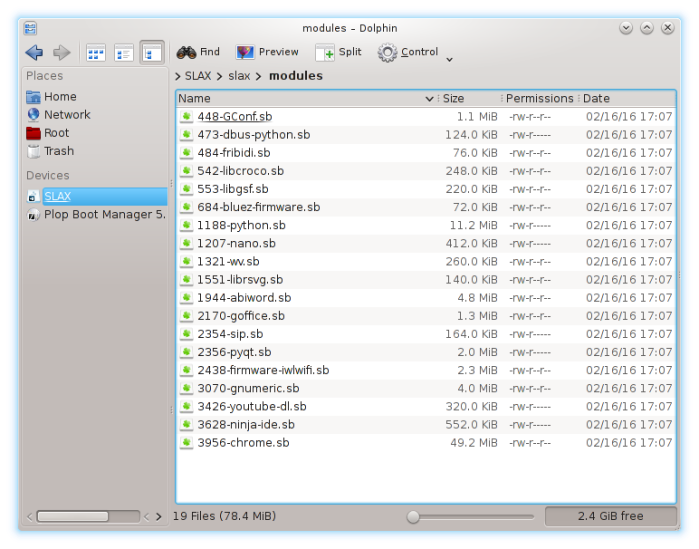
Slax is pretty small in its core size, and this comes at the cost of pre-installed drivers. Intel drivers for wifi are not installed by default and it would make sense to download them before hand to the “modules” directory. While you are are it, you might as well browse the Slax modules catalog and download all sb files that interest you along with their dependencies into the /slax/modules folder. At bare minimum, I settled for chrome, nano editor, abiword, gnumeric and their dependencies, which i manually copied into the “modules” folder. When Slax boots, all these modules will be located and activated for use.

snapshot5

Now its time to copy your “custom” slax setup onto the ext4 formatted usb drive and install the bootloader. Copy over /slax onto the root of the pen drive. You may need root access for this, Use sudo command if required. Once copied, locate bootinst.sh under /boot on the pen drive and execute it. It will try to install the bootloader onto the usb drive. Once done the installation is complete. Its that simple.

bootloader
Boot the laptop from the USB. If booting from usb is not an option due to older BIOS, use the PLOP boot manager to enable the boot from usb option. Once done, you should be able to boot into the Slax KDE4 environment without any issues. The wifi module installed manually will allow you to scan available networks and connect to your wifi. Check options “connect automatically” and “system connect” to be able to connect automatically on every reboot.

These are the basic steps in a nutshell-

1) Download and extract contents of Slax to a local folder.
2) Copy essential sb files and related dependencies from Slax modules web page and manually copy them onto the /slax/modules folder
3) Format a USB drive in ext4 format. Capacity of the drive is an individual choice, higher the better.
4) Copy the “custom” slax folder with all dependencies to the root of pen drive. Use sudo if required (or copy as admin if using Windows machine).
5) Install boot loader by running /slax/boot/bootinst.sh (or bat if you are using a Windows machine).
6) Restart laptop and boot from USB. ( If booting from usb is not an option due to old bios, use the PLOP manager ).

Enjoy the new Slax setup!

SLAX : I can’t thank you enough!

A while ago I was thrilled to discover Porteus, a small portable Linux distro booting and running off a pen drive. It was cool to carry your distro with you wherever you went and simply boot it off a USB port.

But truth be told, I never got around using Porteus much and installing any useful softwares on that thing puzzled me a lot. It still remained a fancy toy for me to be used only in case of system recovery. Soon enough I got the chance to see it in action. My trusted Lenovo 3000 N100, which I had been using for almost 9 years, had a failed HDD and could no longer boot from it. Attempts to use Porteus to recover any data didnt bear much fruit and I was left with a dead machine and no option but to spend on a new HDD.

While I kept wondering what else could be done, I came across SLAX which again is a live distro that can be booted off a pen drive. Apparently Porteus is based of Slax and while I was having a tough time grasping the way Porteus worked, I was immediately at home with Slax. What caught my attention was the modular approach to software installation within Slax. It came with pre budled softwares which you would simply drop into the distro and activate. The changes made to the base installation could be persisted and resumed on next boot. This suited me especially since I wanted something more than booting into a fresh live cd everytime I used by laptop.

So I set out to put this distro to test with couple things in mind

i. It should be able to boot off a usb which would then double up as my storage device

ii. It should be able to add/remove softwares for daily use so that the computing experience is more complete.

iii. It should be customizable to some extent. Didnt really know what to expect here since I am very much new to KDE environment.

Lets see how Slax fared on these parameters for me. Bear in mind, I was least interested in buying a new HDD for a laptop that was almost a decade old. Another concern was what if I did purchase a new HDD and some time down the line another major laptop component gave way, then I would be stuck with a dead laptop with an HDD upgrade that would not be much worth.

Installing Slax onto a pen drive is as simple as copying the “slax” folder from the downloaded zip onto the root of a pen drive and installing the boot loader script bootinst.sh found under “boot” folder. This way when the laptop tries to boot from the usb it knows how to start Slax.

I went ahead and removed the failed HDD physically from my laptop. With the HDD gone, I could change the bios settings to boot from the usb. I had to use the PLOP boot manager here to first boot from a cd and then enable the boot from usb option from the PLOP menu. My laptop does not have a boot from usb option so using PLOP is a handy thing. The PLOP cd can now reside permanently in my cd rom drive with bios boot order set to boot from cd. Selecting usb option from PLOP menu springs Slax to life. It takes some time to boot the entire operating system and a beautiful KDE desktop is ready for use in no time.

Persisting OS changes is really not an issue with Slax. All changes made to the setup are stored under the “changes” folder it creates at the root of the pen drive. If the pen drive is using the native ext4 format then the extent to which changes can be made to the Slax setup is only limited by the pen drive capacity. So I set out with a 32 GB pen drive formatted in ext4 format with Slax installed at its root. This now gives me a freedom to install several Slax modules to make my Slax more functional and still have enough space for documents, music and video files and possibly some space for downloads.

This was perfect, since now I could do away with installing a HDD and still use my laptop with more options to install software and have space for my stuff.

First impression after the boot were impressive, Slax is all of 200 MB, yet it manages to give some basic applications and a KDE desktop which works well and feels stable. But I almost immediately hit a road block. Seems Slax was not able to connect to my wifi. It did not have the required drivers installed. That was bummer. Without a wifi connection how was I supposed to start downloading other things!

I grabed another laptop with a working internet connection and headed over to the modules section on the Slax website. It had the wifi drivers module for Intel which I promptly downloaded and physically copied into the “modules” folder on the pen drive. This got detected and activated on the next boot and my Slax setup was now connected to wifi. That’s the fun part of managing software on Slax, they are available as bundles and either can be manually dropped into the “modules” folder or choose activated via a right click on the downloaded sb file. Pretty soon, I was browsing through the catalog of modules and had nano editor, Abiword, Gnumeric, Chrome and other useful programs downloaded and installed onto my Slax setup. Once activated, these bundled showed up on the KDE menu and I could start using them right away.

With storage and software taken care of, I started customizing things the way I wanted by adding some widgets or changing the task bar with program shortcuts and other things. This is where Slax seems to give me some trouble. Apparently the changes made to the task bar and widgets would not load correctly the next time I rebooted and the screen would go blank making things unusable. I reverted back by simply deleting the “changes” folder and letting slax create a new one as if it were its first boot. Things seem to work well after that. So I guess I will stay away from customizing KDE panels should they cause me any trouble going ahead, because once I start using slax on a regular basis I shouldn’t feel the need to backup and restore things because of some config changes. Either ways the default KDE4 desktop is good and usable so I guess I will stay away from the temptation of customizing the setup. For me, the functionality of this OS would preceed its looks.

And that brings me to an end of my attempt to resurrect my laptop. Compared to an HDD upgrade, I would be spending peanuts on the 32 GB pen drive. I may be compromising a lot on space with just 32 GB to use, but what I gain instead is a completely usable linux distro with softwares that are easy to manage.  My decade old laptop has been a trusted machine and I cant thank Slax enough to give it a new lease of life.